 Epson printers are renowned for their vast range of high-quality all-in-one printers and ink cartridges. So, it’s no wonder that homes, offices and businesses worldwide choose Epson printers and ink cartridges when in need of a printer that offers value whilst maintaining a high printing standard.
Epson printers are one of the most varied in designs, with no two printers designed in the same way. This means that you’ll need to ensure that when it comes time to change your Epson printer ink cartridges, you understand how to install and change the Epson toner in your printer correctly. Today’s guide from Toner City will take you through how to change the ink in your Epson printer correctly, so you’ll be ready to print your important documents in no time.
Check Your Epson Toner Ink Levels
Before you go out and buy replacement Epson ink and toner cartridges for your printer, it’s also essential to make sure that your cartridge levels are low and you’re not wasting any leftover ink. You can check the level of your Epson ink and toner cartridges by the following steps.
1. Press the Home button (house icon)
2. Go to Setup and hit the OK button
3. Press Ink Levels and then the OK button
4. Your ink levels will then be displayed on the screen.
Installing Your New Epson Toner Cartridge
Although most Epson printers are similar in rectangular size and shape, their composition and ink capacity will vary. It’s vital that before you start these ink replacement methods, you have your new Epson ink cartridges ready for immediate installation.
How to change the ink cartridge in an Epson WF 2630
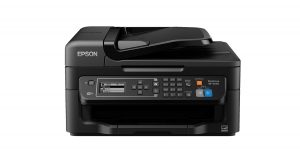
1. Turn on your Epson WF 2630 printer.
2. If your ink cartridges are low, you’ll receive a message outlining which cartridges need to be replaced. Hit Proceed and follow the instructions on your printer’s screen.
If your cartridge isn’t empty, but you want to change it, press the Home button, then to Setup and press OK and Maintenance before scrolling to Ink Cartridge Replacement and press OK.
3. Lift your printer’s scanner unit (not just the scanner’s cover) to see your printer’s ink cartridges.
4. Once the printhead has stopped moving, you can take the cartridges out.
Be extra careful not to touch the printhead and the flat white cable inside the printer.
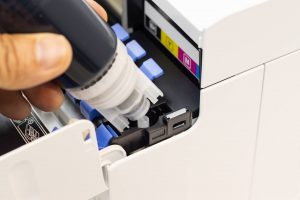
5. Squeeze the tab at the back of the cartridge you’re replacing and pull it forward and straight up. Be careful not to get the leftover ink on you as it can stain. If you get ink on your hands, wash it off with soap and water.
6. Gently shake your replacement cartridge up and down four to five times while it’s still sealed. This will help redistribute any setted ink.
7. Remove the plastic packaging, including the yellow tab that seals your Epson ink cartridge. Don’t take any other wrapping off.
8. Put the cartridge straight back in until it clicks.
9. Close the cartridge cover and press Check on your screen to ensure your ink cartridges are installed correctly.
10. Your printer will automatically start priming before a message on your screen tells you you’re ready to print.
How to change the ink cartridge in an Epson XP-200 & Epson XP 220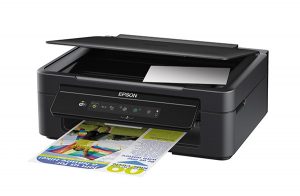
1. Turn your Epson XP-200 printer on and lift the scanner unit so you can see your ink cartridges. Don’t move the printer head by hand or touch the white cable inside, as this can damage your printer.
2. Press the red stop button. If your cartridge is low or empty, the printer head will move that cartridge to the indicator position with the empty droplet icon.
If no ink cartridges need to be replaced or the printer head doesn’t move, press the red stop button for 6 seconds. Press the red stop button again until the printer head is in the proper position to install your cartridges.
Squeeze the tab at the back of the cartridge you’re replacing and pull it forward and straight up. Be careful not to get the leftover ink on you as it can stain. If you get ink on your hands, wash it off with soap and water.
3. Gently shake your replacement cartridge up and down four to five times while it’s still sealed. This will help redistribute any setted ink.
4. Remove the plastic packaging, including the yellow tab that seals your Epson ink cartridge. Don’t take any other wrapping off.
5. Put the cartridge straight back in until it clicks.
6. Lower the scanner unit on your printer and press the red stop button.
7. The printer head will then move to its position and start priming the ink. Once this is complete, the power button will stop flashing.
Note: If the ink light is on after the print head moves to its home position or the power light is still flashing 3 minutes after replacing a cartridge, an ink cartridge may not be installed properly. Press the stop button, then press the ink cartridge down until it clicks into place.
Choose Toner City for High-Quality Ink Cartridges
We hope this guide has helped you to easily install your Epson printer’s new ink and toner cartridges. For specialist advice for your printer or assistance in finding the correct instructions and cartridges for your printer, contact our team at Toner City.