 Getting the best from your HP printer means keeping up with maintenance and ensuring you follow the right steps when you do so. At Toner City, we’ve put together a comprehensive guide to HP ink and toner replacement, so you can keep your machine performing at its best no matter the model. Read on to find out more.
Find the best replacement method for your printer
HP’s wide variety of printer models means you can find the one best suited to your needs. It also means each of these printers will have its own dedicated configuration, so we’ve broken down the best methods to use according to each HP model. You can find the full breakdown below.
How to change an HP61 Inkjet cartridge
- Ensure the printer is loaded with the appropriate paper. This will allow you to run an ink check once you have successfully replaced the ink cartridge.
- To access the cartridge, open the door or lid to the access area and wait for the carriage to stop moving.
- Remove the cartridge. Some carriages have a latch, meaning you’ll have to open the latch to access the cartridge inside. For carriages without latches, simply press on the appropriate cartridge to pop it out of position.
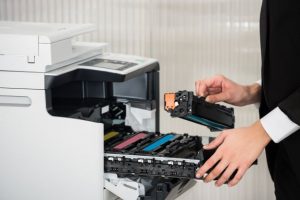
- Being careful to hold it by its plastic sides so as to avoid staining yourself, remove the new cartridge from its packaging.
- Remove the marked tape and place the cartridge in its corresponding colour slot, ensuring it is correctly positioned in its designated slot within the carriage.
- Close the latch if applicable, then close the door to the cartridge access area. If the printer prompts you to do so, run an alignment test to make sure all cartridges are positioned correctly.
How to change an HP OfficeJet Pro 8600 ink cartridge
- Make sure your HP printer is turned on.
- To open the cartridge access door, insert your fingers into the slot on the left-hand side of the printer then pull open. This will trigger the carriage to move to the left side of the printer – wait until it is stationary and idle before proceeding.
- To remove the cartridge from its slot, simply push into it to release and pull on the now loosened cartridge.
- Remove the new cartridge from its packaging and, ensuring the contacts are facing the printer, insert the new cartridge into place making sure it clicks into its slot.
- Close the cartridge access door and wait for the printer to finish its warm-up sequence. You can resume using your printer once it is quiet again.
How to change the ink cartridge on an HP OfficeJet 4630
- Prior to turning the printer on, ensure the paper tray is loaded.
- To open the cartridge access door, locate the two slots on the side of the printer and gently lift. Once the carriage has moved to the cartridge access area wait until the printer is silent and idle before continuing.
- Lift the lid on the ink cartridge slot until it stops, and remove the cartridge.
- Remove the tape from your new ink cartridge and hold it at a gentle upwards angle, making sure the contacts face the rear of the printer, then slide the new cartridge into the empty slot.
- Close the lid on the cartridge slot and close the cartridge access area door. Then, follow the instructions on the printer to complete a cartridge alignment. Once this is done, your printer is ready to use.
How to change the ink cartridge on an HP DeskJet 2540 and DeskJet 1510
- Make sure your printer is turned on and loaded with paper in the appropriate size
- Remove the cartridge by opening the cartridge access door and waiting for the print carriage to centre itself. To release the cartridge, simply press down on it and remove.
- Making sure all packaging has been removed (including the plastic tape seal) slide your new ink cartridge into the slot, ensuring it clicks into place.
- Once the new cartridge has been installed, close the cartridge access door. You can choose to run an alignment program now to ensure all the cartridges are correctly positioned.
How to change the ink cartridge in an HP PhotoSmart 5520
- Turn on your printer and open the cartridge access door.
- Once the carriage has stopped moving, remove the cartridge from its slot.
- Prepare your new ink cartridge; remove it from its packaging and remove the plastic wrap by pulling on the orange tab. Making sure to hold the cartridge by its side, remove the orange pull-tab by twisting it counterclockwise.
- Locate the tab at the front of the cartridge and gently bend – making sure not to pull it further than 1.25cm from the rest of the cartridge. Place the new cartridge into the corresponding slot and click into place.
- Close the cartridge access door.
Quality Print Supplies From a Trusted Retailer; Shop Toner City Ink Cartridges Today
Printer cartridge not working the way it should? Or are you simply looking for a list of the best Epson cartridges around? At Toner City we have a solution for all of your printing supply needs, so you never have to be without. Discover a range of high-quality products from our catalogue today, or contact us today to speak to one of our dedicated team members for specialised advice on how to keep your printing setup running smoothly.